


Brick arch lintels were traditionally used for structural support but now, they are used as decorative elements. Brick arches enhance the door and window openings. These arches can be installed indoors to add an aesthetically pleasing element to your interiors. Or you can build a brick arch for your garden. You can build a brick arch lintel by yourself too, as professional masonry experience is not a prerequisite to build brick arch lintels. Here is how you can build one for your home or garden:
How to build a brick arch lintel
First, you have to gather all these materials, to build the arch:

Measuring tape, plywood sheets, circular saw, wood screws, power drill, carpenter’s level, mortar, concrete mix, mason’s trowel, concave tool for brick joint, jigsaw, wood glue, drop cloth, mister, sheet plastic, saw, ladders, pencil, string, L-Square.
A few helpers would be handy to lift the brick arch lintel above the door or windows!
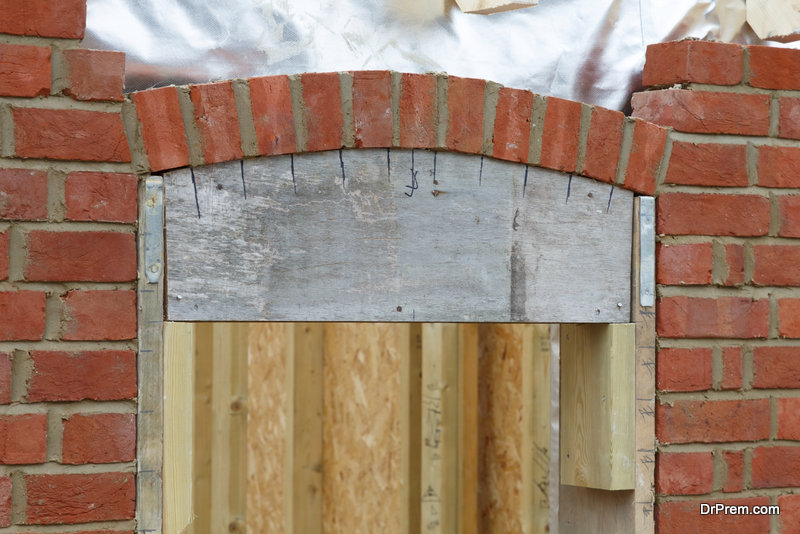
When you are building a brick arch lintel, you have to first construct a wooden support.
Building the support
First step
The first step is to measure the opening’s width at its highest point, before arch begins. It is known as ‘springing line’ and this forms your base for the wooden support.
Second step

Transfer your opening’s measurement to bottom edge of your plywood sheet. Then, after finding the exact centre, mark it at the plywood sheet’s bottom edge. This point is called as the ‘striking point’. After this step, tie some string to the pencil, placing the pencil’s point at one of the ends of springing baseline.
Third step
Now, keep the string tight, and place the string’s other end on the striking point and draw a semi-circle from one of the ends of the baseline to the other. All these steps are quite simple and basic but have to be executed perfectly when you build a brick arch lintel.
Fourth step
Draw one vertical line which is at ninety degrees to your springing baseline from centre point. Use L-square and straight edge. After this, mark the exact point where perpendicular line bisects semi-circle arc. This marks the position for your keystone, which is one of the most important construction detail when you build a brick arch lintel.
This is because the keystone locks the brick arch into its place. Then, start counting from the keystone to find out the number of bricks you will need to fill both the sides.
Fifth step
Now, cut the semi-circle using the power jigsaw. Use the shape you have cut out as the template to cut another semi-circle. These two cut-outs will form the two sides of the wooden support.
Sixth step
Whether you are building the arch for your door or over windows, you have to execute this step carefully. You have to nail a lumber piece on the edge of the base of the semi-circle. If you are going to place the bricks or lumber upright, or in soldier style, then use a 2×4 lumber. If you are planning to place the bricks horizontally then use a 2×8 lumber piece.
Nail similar lumber pieces along the perpendicular, and two pieces of lumber on both sides of the perpendicular to create a triangle shape. Then, nail the other semi-circle cut-outs to lumber.
Now, cut one strip of the flexible hardboard and nail this to the plywood’s curved edge.
How to build the brick arch
After building the wooden support, you can follow these steps to build a brick arch lintel.
First step
You first have to build two pillars on both sides of the opening to the height which ends at the arch’s beginning point. This step has to be done when you are making a brick arch above the door. The pillars have to be deep and wide to support the brick arch. It is better if the pillars are wider, when you are trying to build a brick arch lintel. It is construction detail which is very important.
Second step
Cut a lumber piece horizontally. This can go beneath the form’s base. Cut two more lumber lengths to be placed against side pillars with horizontal lumber placed on top. Now on top of the support frame, place the semicircle plywood. This is the support you will use when you start placing the bricks.
Third step
Mix the mortar according to the instruction written on the pack. Then put some mortar on the top of one of the pillars, with narrow edge, facing the inside of arch. Now, place your first brick on the mortar. Align the brick according to the imaginary line which runs through the brick’s centre up to the striking point on the arch’s base. Repeat this step for the other pillar.
Fourth step
Apply mortar on another brick and place this on your first brick. Repeat this on the other pillar. When you build a brick arch lintel, you have to build your arch equally on both sides to maintain the balance. Continue laying bricks till you reach the keystone point, and all bricks have to be aligned with your central point.
Fifth step
Now, the keystone has to be buttered with mortar on both edges and wedged into the arch’s top. This will help to lock the arch or bricks in place and the stress tension will be transferred to the brick pillars instead of the wooden support frame.
The keystone can be a size which is bigger than the bricks, to add an extra decorative element in the lintel you are building for over windows or a place inside your home.
Sixth step
You have now successfully built your brick arch lintel. Now, give ample time, a few days so that the mortar sets properly. You could also even out the mortar at this time. After your mortar has set, remove the wooden support frame as well as the semi-circle form.
As the brick arch lintel will be heavy, you might need some willing helpers to help you carry and place it. Enjoy your hard work which might inspire you to execute some other home improvements on your own!